Sunday, January 11, 2015

Day 4: Valentine's Day Fun

Yep...already behind my goal of posting one thing everyday.  Well, I'm not going to let that stop me.  :)

I am making some super cute Valentines for my kids this year and thought you might like them too!  I have had these adorable food graphics since last year, had an idea, but it never went anywhere.  So this year I was determined to create something cute and "We Go Together" valentines are the result. The combinations are:

  • Hot Chocolate & Marshmallows
  • Apple and Pie
  • Milk and Cookies
  • Root Beer and Ice Cream
As you can see, I used jelly beans for the candy.  There are probably a bunch of other flavor combinations...but I just stuck with these four.  Recipes below.

I formatted the tags to fit nicely with a 4" x 6" bag (found at any craft store).  After printing them, I folded each tag in half and used a scallop border punch along the bottom.


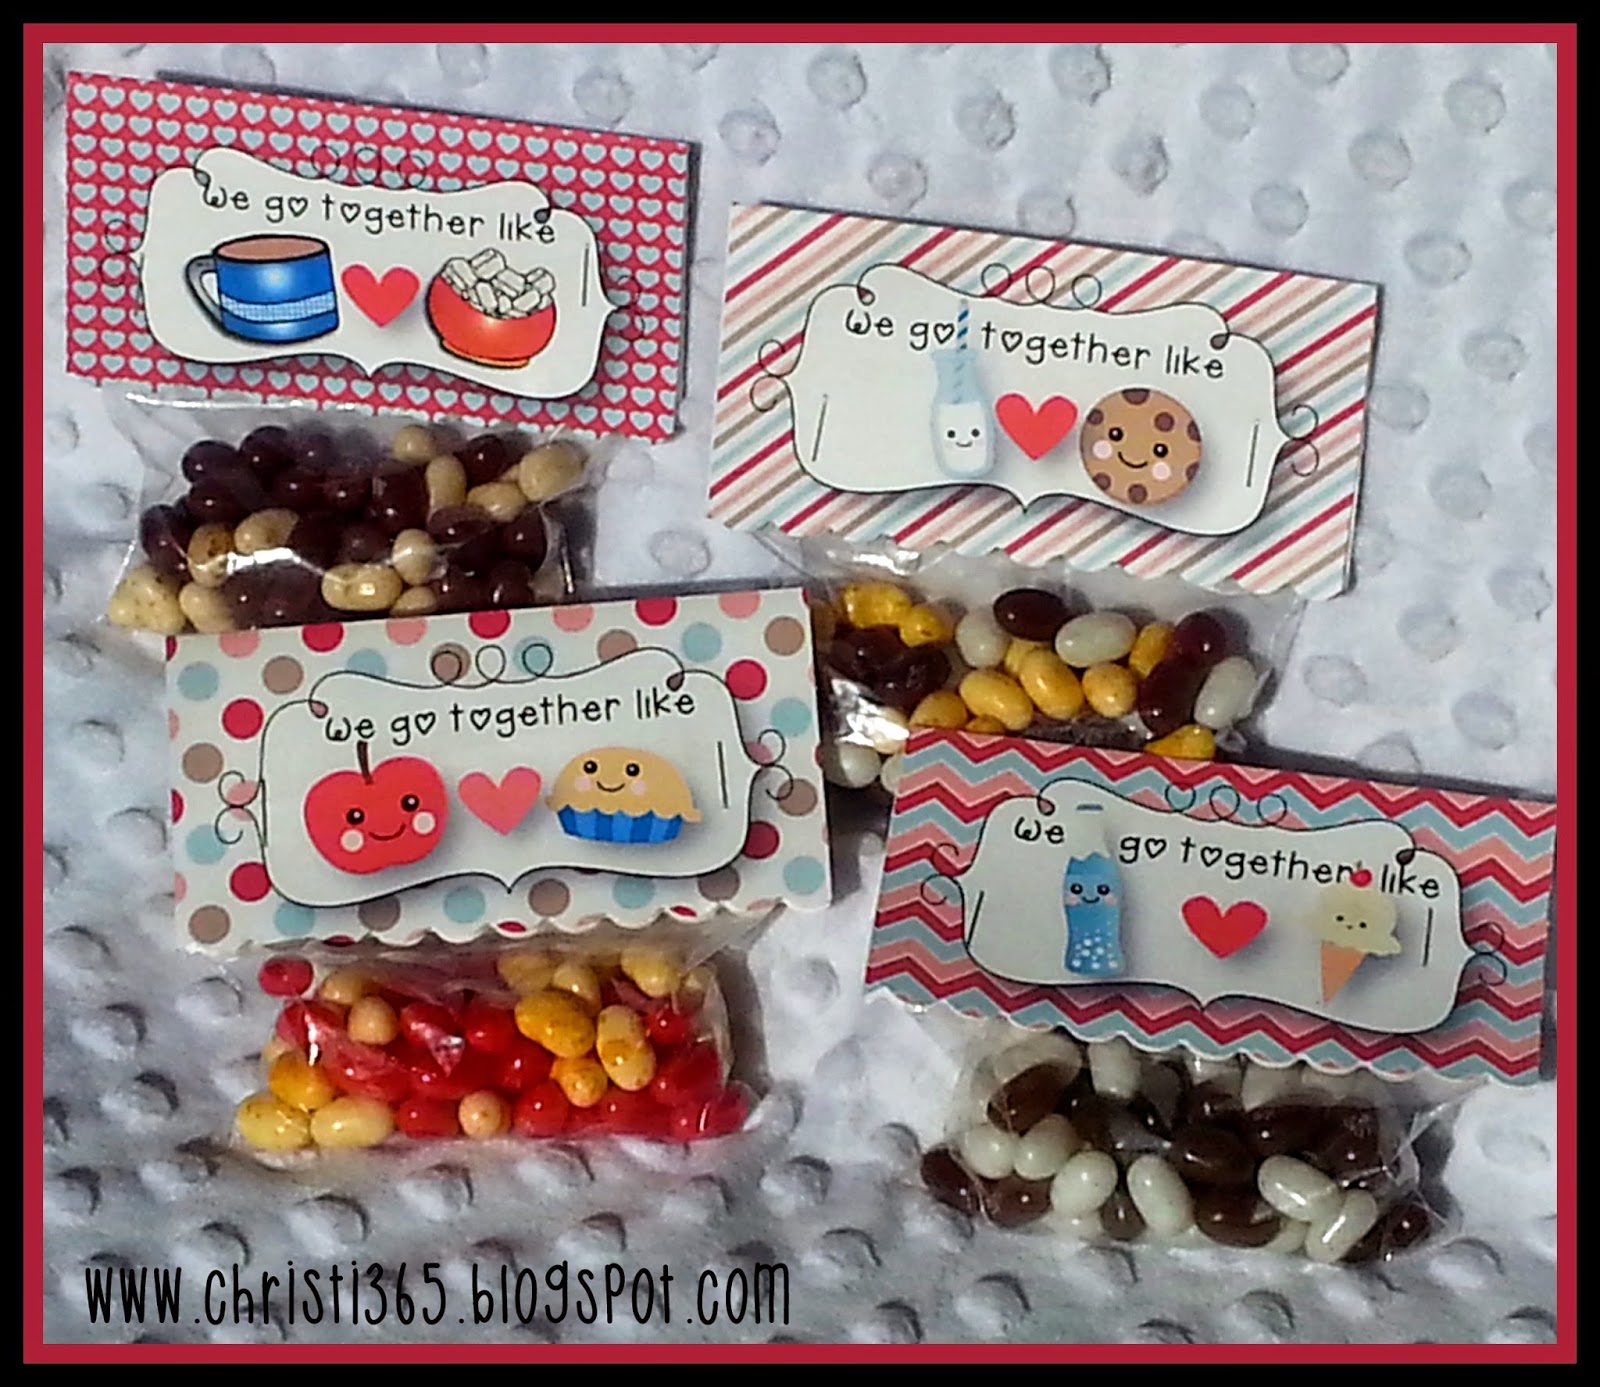
These are the Jelly Belly beans used for each combination:


Now all that's left to do is fill out the backs!


Materials used:

  • We Go Together labels (download and print)
  • Small ziploc bags, size 4"x6" (I found a pack of 100 at Joann's for about $5)
  • Scallop border punch
  • Jelly Belly bean flavors (I purchased 1 lb bags from amazon.com):
    • Red Apple
    • Caramel Corn
    • French Vanilla
    • Chocolate Pudding
    • Root Beer
    • Toasted Marshmallow
Enjoy!  Super fun to taste the flavors together!

Saturday, January 3, 2015

Day 3: Mistle "Toes" Christmas Gifts

During a road trip, I was browsing pinterest and saw a super cute idea post (here) and immediately decided that was something I wanted to recreate for some Christmas gifts.  I just loved the saying and loved the idea of making a mini-pedicure in a bag.  Plus, it looked so easy and fun!


I used my Silhouette cutter with white glitter paper to create the tag and two other papers for the background.  The dimensions of each paper is approximately:
  • Top layer (white glitter): 2" high x 6.25" wide (I cut the rectangle after the words had been cut)
  • 2nd layer (solid blue): 2.5" high x 6.5" wide
  • Bottom layer (glitter polka dot): 6" high x 7" wide.  This piece folds in half and sandwiches the bag opening.
In each bag (small clear gift basket bags, Michael's) I put:
  • True Blue Foot Cream (Bath & Body Works)
  • Opi Nail Polish (color chosen specifically for each gal)
  • Nail Files (I found some really cute ones at Bath & Body Works before Christmas)
  • Pedi Scrub Foot Buffer, Lavender Aromatherapy scent (Amazon.com)


This gift was fun to make, fun to give, and would be super fun to receive!  I'm planning on using this idea again, but with different sayings.  Here are a few ideas:
  • Mother's Day:
    • "Hands down, You're the best!"  
    • "Thanks for always holding my hand!"
  • Teacher Appreciation: "Thank you for helping to 'polish' our student's skills!"
  • Birthday/Just Because: "Never let anyone dull your sparkle!" (include glitter polish too)


Can't wait to give this gift again!


Friday, January 2, 2015

Making sure to say "Thank You"

I think it is really important to say 'Thank You" when given a gift..but this is especially true during the holidays.  My kids don't always get to see everyone, so sending a thank you note is a nice way to let that person know how much they liked the gift.

Today I made thank you cards for my kids to send for the gifts they received last week.  I used my Silhouette cutter and software to design a fun card with a cute saying that I had seen previously on a Hallmark card.  You can see the final product below.

I had SO MUCH FUN designing and choosing papers for this card!  I also found some small bags from Michael's to put the cards in before sending them in envelopes.


I can't wait for people to start receiving them!  We'll be finishing and signing them tomorrow before shipping them off!

Here's a link to version for you- if you'd like to make a similar style card.  It's a blackline version of the card to print on cardstock, cut, fold, and embellish!  These cards fit nicely in 4 3/4 x 6 1/2 envelopes (called Photo envelopes at Staples).

Snowman Thank You Card to print at home


Here are also two other Thank You cards that I've created and used in the past.  All graphics are DJ Inkers.

I typed personal Thank Yous to my students when I was teaching.  Below is an editable template (MSWord) for you to use, if you wish.  There are 2 cards per page.  All you have to do is type the message, print, and send/give!  They fit perfectly in greeting card envelopes size 5 3/4 x 8 3/4.


I created this card when my son was 4- he was IN LOVE (and still is) with dinosaurs.  I combined several DJInkers clip art images in Adobe Photoshop to create a fun way for him to say Thank You to the multiple gifts (many dinosaurs) he was given that year.  Again, I typed personal Thank Yous and had him sign them.
Below is an editable template (MSWord) for you to use, if you wish.  There are 2 cards per page.  All you have to do is type the message, print, and send/give!  Again, they fit nicely in greeting card envelopes size 5 3/4 x 8 3/4.
  

Enjoy!

Thursday, January 1, 2015

Follow Your Dreams

One of my goals this year is to share some of the items I've created.  Here's a quote that I will be posting in my office when I return to school.  It's a great reminder on those days when you're just not sure of the path you should take.


You can download the pdf (with smaller watermark) here.

Enjoy!